The Edit Mode
Entities in LinkAhead can be changed, created, and deleted using the
Edit Mode. In the following chapter, you’ll learn how. You should
be fairly familiar with the concepts of Records, RecordTypes and
Properties in LinkAhead. If you have doubts, please have a look at the
data model documentation.
Getting started
In usual setups of LinkAhead, you have to log in to use the edit mode. Afterwards, you can access it by clicking on the button in the top menu as shown below:

After entering the edit mode, the button changes its text to Leave
Edit Mode. Unsurprisingly, clicking here terminates the edit mode.
Note
The edit mode is only available if you have sufficient privileges. You can only create/edit/delete entities if your user is allowed to do that. User and group permissions can be configured in detail as explained in the server documentation.
When you have entered the edit mode, you’ll see the edit mode toolbox appearing on the right hand side of your screen:
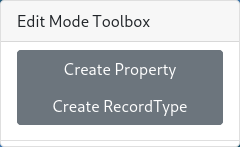
You’ll learn more about its contents in the following sections. Right now it only contains the options for creating a new RecordType or Property which we’ll explain in Extend your data model: Add RecordTypes and Properties.
Changing an existing Entity
We’ll start by changing and updating existing entities. First, find the entity you want to change and enter the edit mode. You’ll see an edit button in the top right of the entity card:
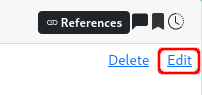
After clicking on this button, the edit menu for this entity is opened as shown below for a guitar Record from the demo. You’ll also note that the edit mode toolbox changes its contents: It now harbours two lists of the existing Properties and RecordTypes.

Property values can be changed in the entity card directly; additional parents can be added by dragging them from the list of RecordTypes to the corresponding area at the top of the Record. Similarly, Properties can be added by dragging Properties (or RecordTypes) from the list in the edit mode toolbox to the corresponding area at the bottom of the Record. Properties and parents can be removed from the entity by clicking on the trash-can symbol. Note that a Record must always have at least one parent.
From LinkAhead WebUI version 0.15, the default behavior for changing the values of reference properties has changed in that the dropdown menus to select possible values are not filled automatically for performance reasons. Instead, you have to click on the pencil symbol to the right of the property you want to edit:

Note
The behavior of version 0.14.x and before, i.e., enable and load
all reference dropdowns immediatly after starting to edit the
entity, can be restored by starting LinkAhead with the
BUILD_EDIT_MODE_LAZY_DROPDOWN_LOADING = DISABLED option.
When many Entities are valid candidates for a reference property not all might be available in the drop down element. In those cases, the drop down warns, that only a subset is shown and a new button with a pencil symbol is shown. This allows to enter an ID manually (Click the pencil button, enter the ID and press Enter). If you wonder how you find the ID of an entity: You can see the ID of an Entity if you click on bar code icon in the upper right corner of the Entity card.
Changes will be applied after clicking on Save or can be discarded
entirely by clicking Cancel. Existing Properties and RecordTypes
can be edited in the same way. Note that when changing a RecordType,
the properties don’t have values.
Creating a new Record
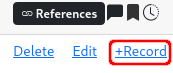
If you want to create a new Record of a given RecordType, visit that
RecordType and enter the edit mode (if your new Record will have more
than one parent, visit any one of them - you can add the others
later). A new Record is then created by clicking on the +Record
button in the top right of the RecordType:
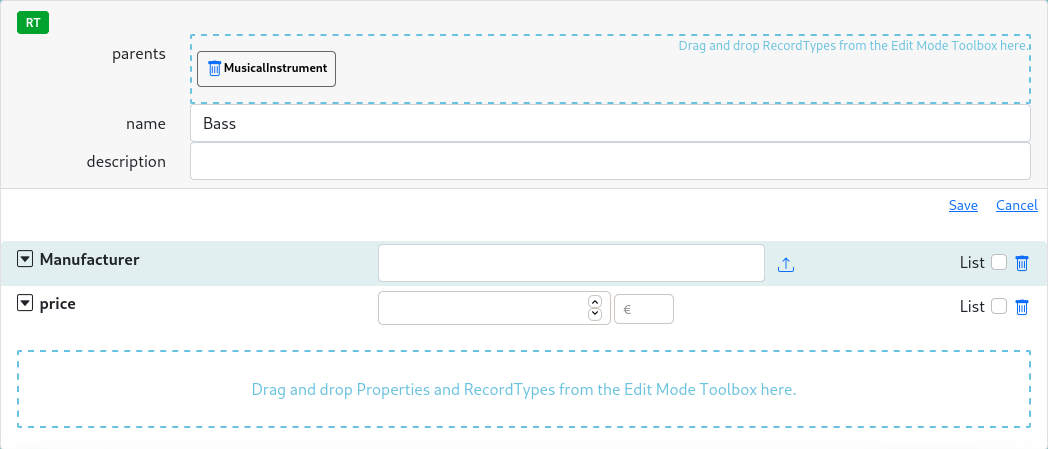
Clicking here opens an entity card with an edit menu for the new
Record similar to the one discussed in Changing an existing Entity. In
here, you can enter the name and the description of your new Record,
assign values to its properties, and add further parents or properties
from the corresponding lists in the edit mode toolbox. The new Record
is inserted by clicking Save.
Extend your data model: Add RecordTypes and Properties
You can extend the data model of your LinkAhead by creating new RecordTypes and Properties directly from the WebUI. This is done by clicking on the “Create Property” and “Create RecordType” buttons in the edit mode toolbox:
New RecordType
When creating a new RecordType, a RecordType card is added to the entity panel, similar to the “New Record” explained above:
As above, you can enter a name and a description. Don’t reuse existing names, if it can be avoided.
You can add parent RecordTypes by dragging existing RecordTypes on the “parents” zone above the “name” field.
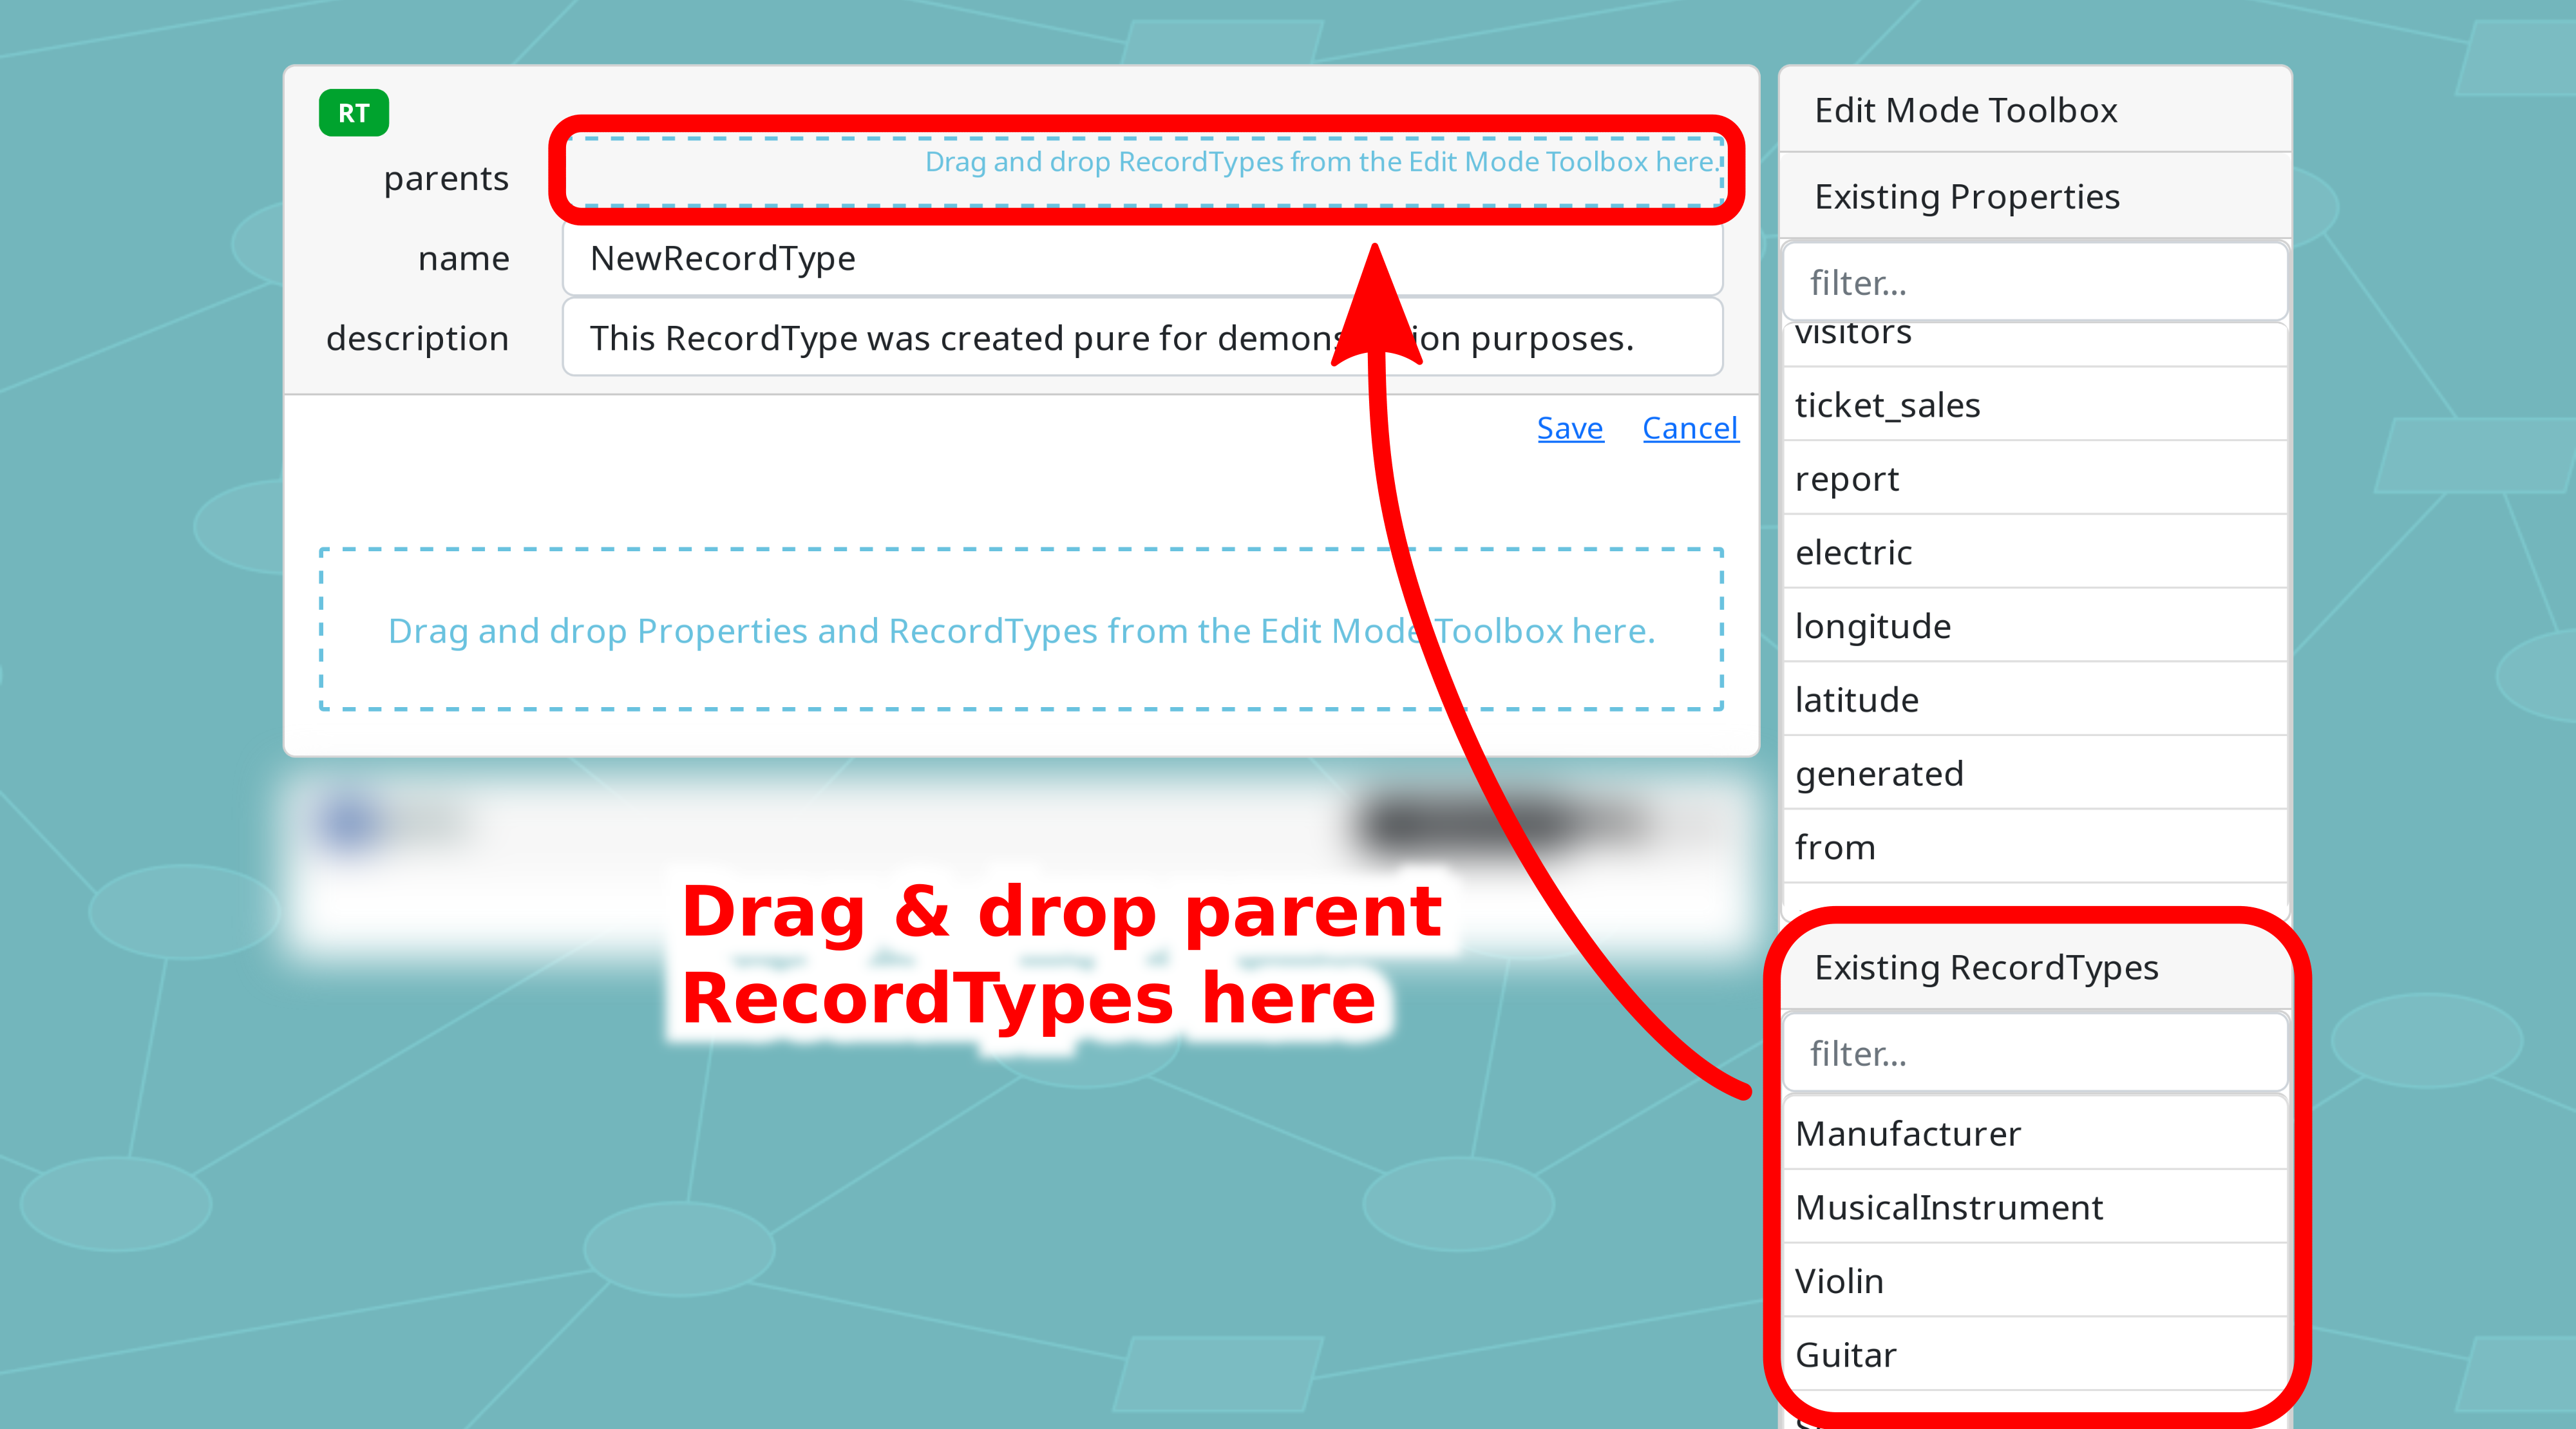
Note
Adding parents currently (May 2023) does not automatically add the parents’ properties yet. You will have to do this manually.
Add Properties as described above by selecting them from the lists in the edit mode toolbox and dragging them to the Property area in the new RecordType. Note that in contrast to Records, the Properties of RecordTypes do not have values.
Click “Save” to save your newly created Property, or abort with the “Cancel” button.
New Property
When creating a new Property, a Property card shows up:
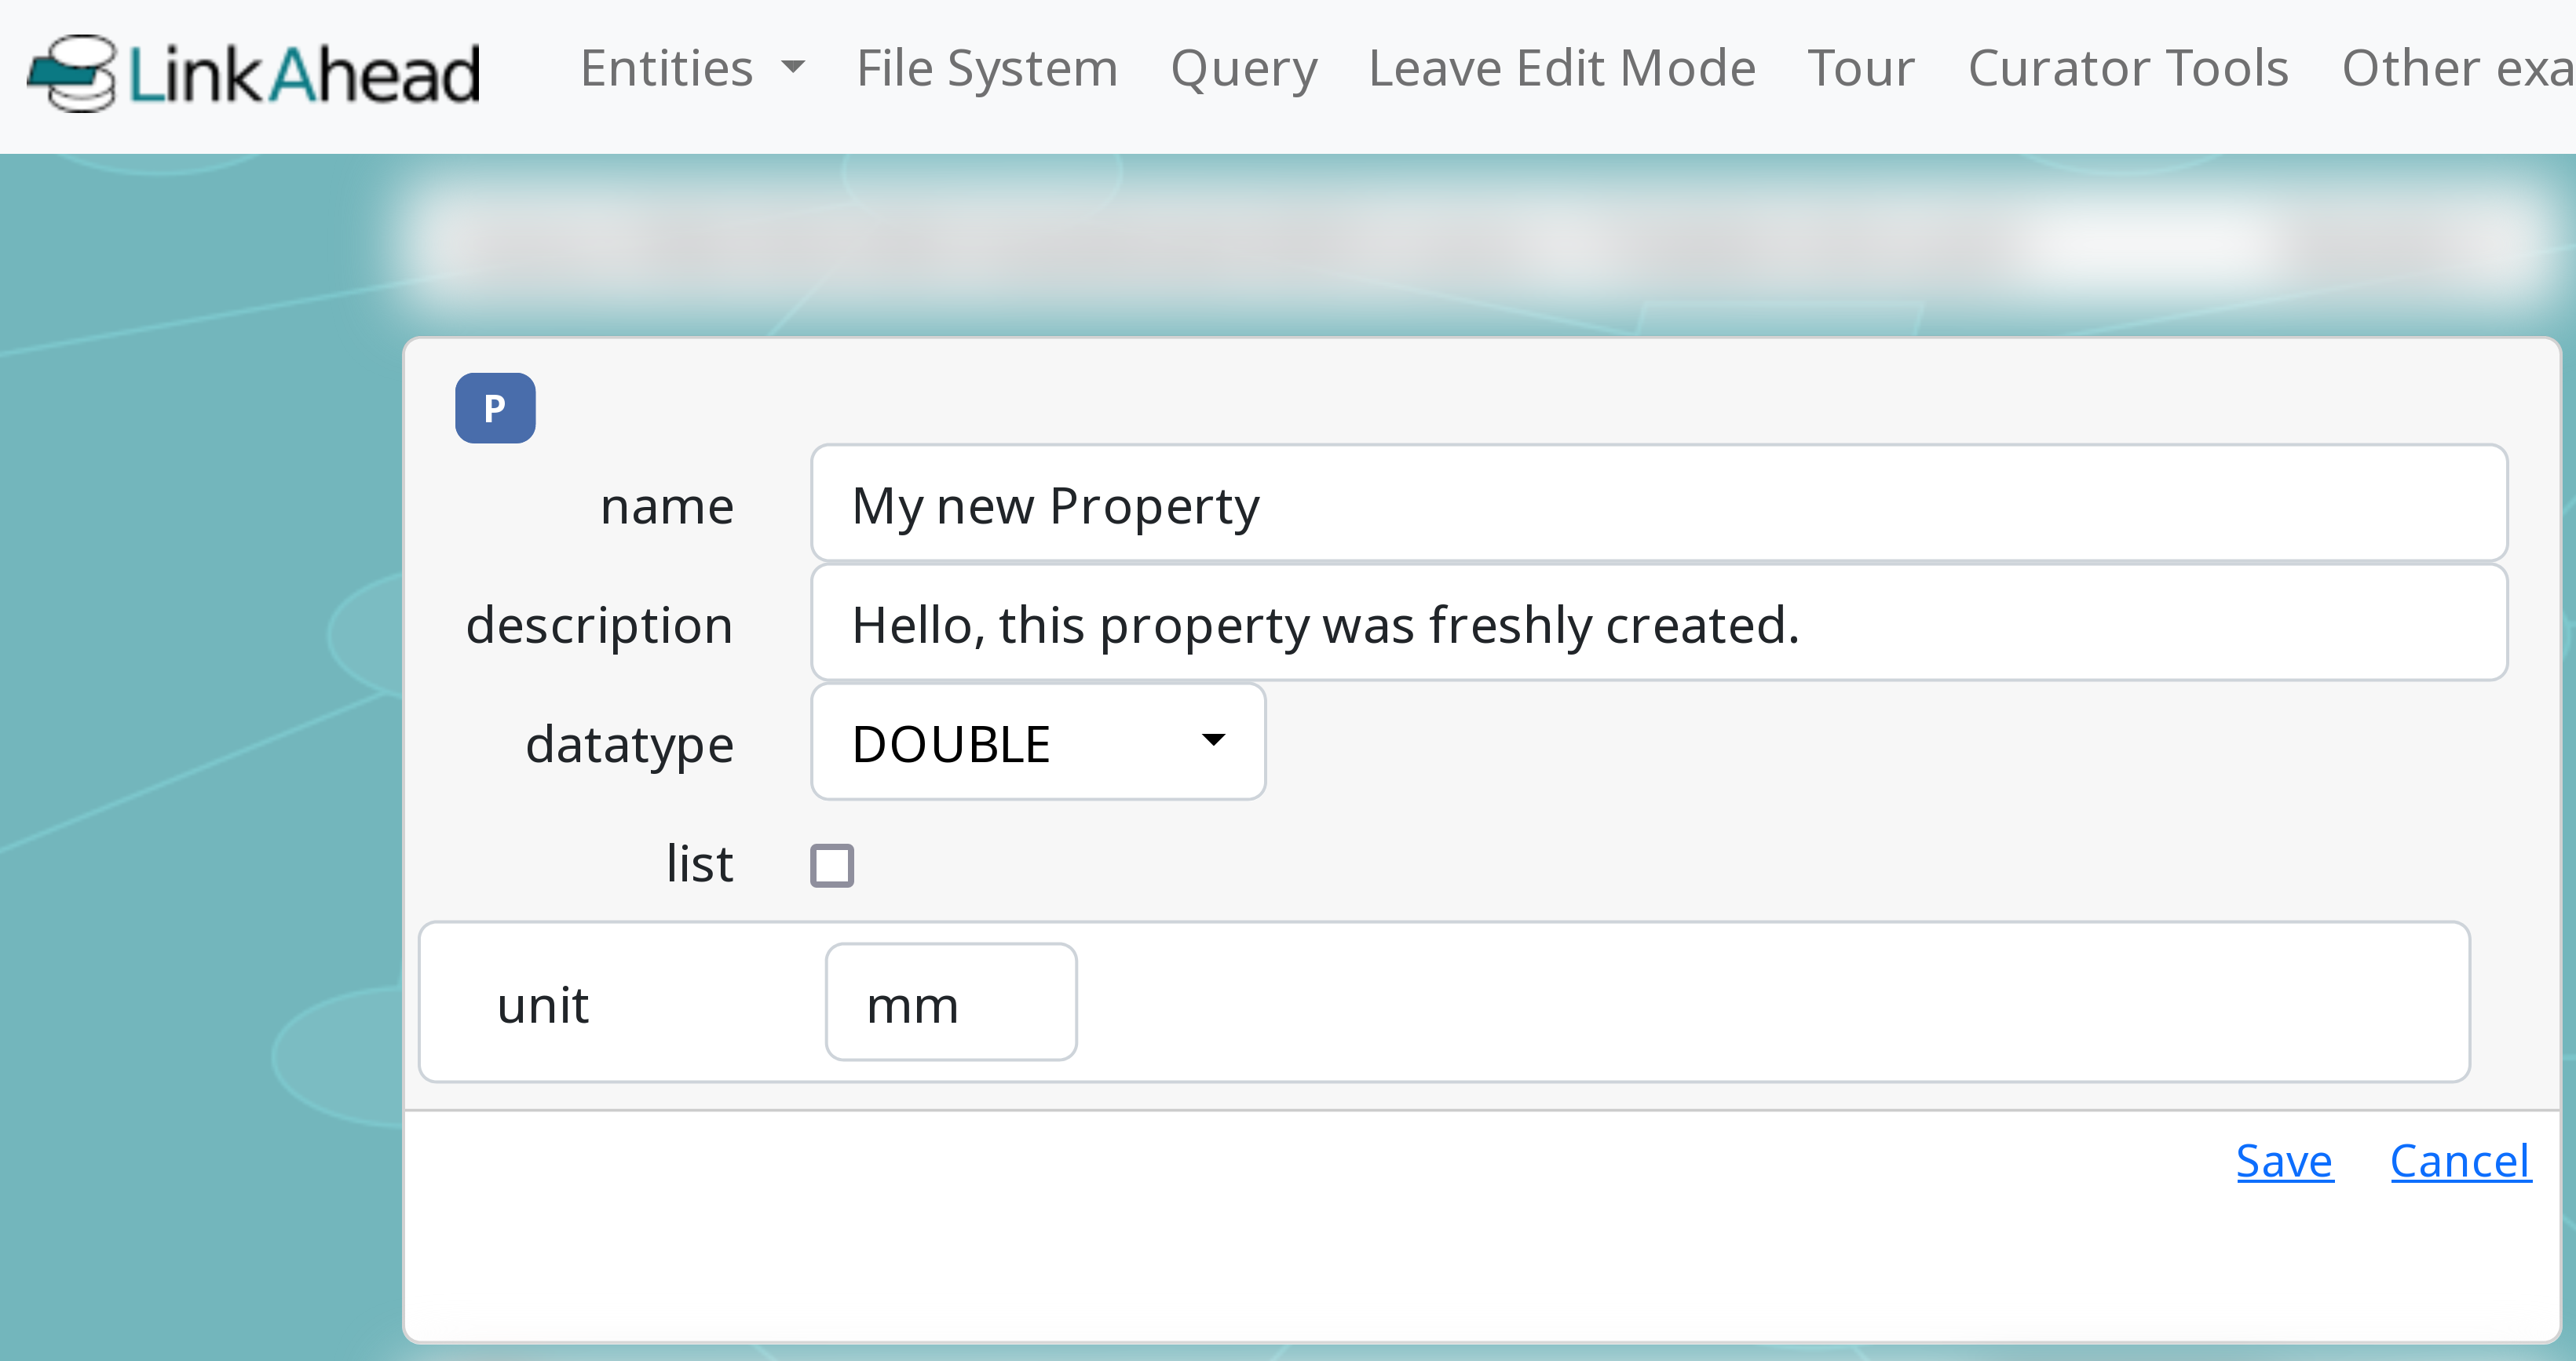
As above, you can enter a name and a description. Don’t reuse existing names, if it can be avoided.
Set the datatype:
TEXT properties hold short and long strings of text. Newlines are also allowed.
DOUBLE properties hold numeric floating point values, such as 3.142. DOUBLE properties may have a unit, you can set the default unit (for example kg or mm) here.
INTEGER properties hold (signed) integer values such as …, -2, -1, 0, 1, 2, …, they can have units just like DOUBLE properties.
DATETIME properties are for dates or datetimes (date plus time of day). LinkAhead does not distinguish between dates and datetimes, because users can freely decide to enter a time if they want to.
BOOLEAN properties can be either
TRUEorFALSE.FILE properties are special, in that they reference a File entity. Files are similar to normal Records, but do not need a RecordType and are connected to a binary file which is stored somewhere.
REFERENCE properties are links to other Records. You can choose a RecordType to further specify which Records are accepted as references.
Inheritance plays a role here! For example, if you select “Experiment”, all “Magnetism Experiment” Records are also accepted (if they inherit from “Experiment”).
See here for more information on the datatypes.
If you want the new Property to be a list, check the checkbox. List Properties can hold many entries of the same datatype.
Click “Save” to save your newly created Property, or abort with the “Cancel” button.
When creating a property with datatype INTEGER or DOUBLE,
i.e., a number, you may enter a unit in an additional input field if
applicable. In case of a REFERENCE property, you may specify the
RecordType that all referenced Records must have. In the above example
a REFERENCE property is created which may only have violins as
values. Again, the new entity is created by clicking on save.
Note
After having created a new RecordType or Property, you may have to leave and re-enter the edit mode for the new entity to appear in the lists of Properties or RecordTypes in the edit mode toolbox.
Save your time!
It is not alway necessary to create REFERENCE properties: In many cases when editing a
RecordType, it’s sufficient to simply drag the target RecordType into the property
field. For example, you can simply drag “CellLine” into the properties of the
“CellCultureExperiment”, this will automatically create a REFERENCE property of type “CellLine”.
Similarly, you can reuse existing non-list properties if you need a list property: Simply click on the “List” checkbox when adding it to a RecordType, instead of creating list and non-list properties with the same meaning.
Of course there are cases where it makes sense to create new REFERENCE properties, notably when you want to give the reference a special name to denote its meaning. For example, you may want to create two distinct REFERENCE properties to “Person”s, one with the name “experimenter”, and one with the name “author”. These two properties now carry different meanings, and may even be used side by side in the same RecordType!
Delete an Entity (Record, Property, RecordType)
Entities can also be deleted by clicking on the delete button in the top right of the entity, once the Edit Mode has been activated:
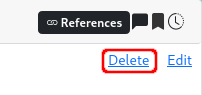
After clicking on delete you’ll be asked for confirmation.
Note
Entities cannot be deleted if they are needed by other entities, e.g., as a reference. To check if an entity is in use, you can start a query like this:
FIND Record WITH myentityto check for Property or RecordmyentityFIND Record MyRTfor RecordTypeMyRT
Make a Property into a list
List Properties can hold many entries of the same datatype. If you want to change if a Property is a list or not, follow these steps:
Find the property you want to change.
Activate the Edit Mode in the top menu. Now the Property should have a clickable “Edit” button.
Click the “Edit” button. A dialog for editing the Property shows up.
Click the “list” checkbox to change the status.
Click “Save” to save your changes, or abort with the “Cancel” button.
Add Properties to an existing RecordType
Find the RecordType you want to change.
Activate the Edit Mode in the top menu. Now the RecordType should have a clickable “Edit” button.
Click the “Edit” button. A dialog for editing the RecordType shows up.
You can drag&drop existing Properties and RecordTypes from the toolbox onto the RecordType’s target area. Note that dragging RecordTypes is similar to explicitly creating a REFERENCE Property of the same type.
Click “Save” to save your changes, or abort with the “Cancel” button.
Remove Properties from an existing RecordType
Find the RecordType you want to change.
Activate the Edit Mode in the top menu. Now the RecordType should have a clickable “Edit” button.
Click the “Edit” button. A dialog for editing the RecordType shows up.
Click on the Trash icon
 to remove a Property. The Property as an abstract
Entity still exists, it is simply not a part of this RecordType any more. Removed properties can
be re-added again at any time.
to remove a Property. The Property as an abstract
Entity still exists, it is simply not a part of this RecordType any more. Removed properties can
be re-added again at any time.Click “Save” to save your changes, or abort with the “Cancel” button.
Uploading files
In case of properties with data type FILE, you can use the edit
mode to upload a corresponding file directly. When editing the Record
which will have the file to be uploaded as the value of the
corresponding property (named SourceFile in the example below),
add the property as described above if it isn’t present already. Next
to the dropdown menu, in which you can choose from existing files, you
find an uploaded button:

Click on it to open an upload dialogue in which you can choose the
file that you want to upload. The files uploaded this way will be
stored within /uploaded.by/<REALM>/<USER>/.
The same is true for properties with data type REFERENCE, too. In
that case, the Record of the file that is uploaded will be assigned the
RecordType of value of the original reference property.